|
|
|
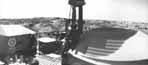
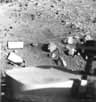
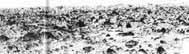
[64-65] These panoramas show the same field of view, looking northwest. Figure 66 was taken in the morning, figure 67 in mid afternoon. The wind cover over the radioisotope thermoelectric generator (RTG) is visible in the foreground. Scalloped drifts or sediment and clusters of boulders accent the landscape. As in other parts of the scene the larger boulders [65] are localized on small hillocks and appear to be either loci for the accumulation of sediment, or stabilizing elements for residual sediment. The small parallel ridges in the left half of figure 66 superficially resemble wind generated ripple marks, but are probably caused by exposed layering in the drift material. |
|
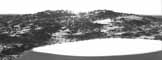
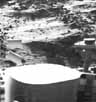
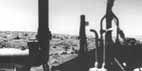
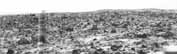
[66-67] This striking panorama shown in two parts (figs. 68 and 69) covers approximately 100° in azimuth. The scene is backlit. The late afternoon Sun is about 18° above the horizon near the middle of the panorama. Some objects on the horizon, as in figure 69, sparkle with reflected light. The top of the low gain antenna is shown in figure 68. The prominent structure visible in figures 69 and 70 is the wind cover for the RTG. The symmetrical ridge on the horizon at the right of figure 68 is a crater rim. It is further described in the text accompanying figures 77 through 79. The origin of the prominent trough in the foreground is undetermined. The higher mound of material in the right half of figure 68 is about 30 to 60 m from the spacecraft. In fact, it is a complex series of ridges occurring at increasing distances from the spacecraft. A part of the same scene, photographed with early morning light, is shown in figure 70. |
These figures dramatically demonstrate the effect of different lighting in revealing detail within the scene. Figure 71 was taken during midday, figure 72 in late afternoon, and figure 73 in early morning. Some of the boulders closest to the spacecraft may have been sculpted by wind driven sand. Particularly well shown in figure 73 are ripple like alternations of bright and dark sediment, a probable consequence of wind sorting and layering during transport.
Numerous pits are visible, especially in figure 73. These are caused by material kicked from beneath the Lander during touchdown.
A part of the UHF antenna that relays Lander data to the Orbiter is shown at the far left. The flat surface at the bottom of the picture is the top of a protective box covering the seismometer. The seismometer on Lander 1 failed to operate, the only significant instrumental failure on either spacecraft. Although the seismometer on Lander 2 worked as anticipated, its ability to detect Marsquakes was greatly compromised because it was mounted on the upper deck of the spacecraft. Most of the recorded vibrations were induced by wind or by operation of spacecraft components.
|
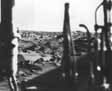
[70-71] Three views (figs. 74 to 76) looking over the Lander through a forest of tubes, most of which served as umbilicals cords linking the Lander to the Orbiter during the 10 month journey from Earth to Mars. The unusual graphic effects are reminiscent of a science fiction illustrator's vision of what a spacecraft on an alien planet should look like. Particularly well displayed in figures 74 and 76 is a view of the same drift complex shown in figures 66 and 67, although this view is taken with the other camera. |
|
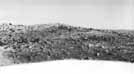
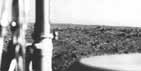
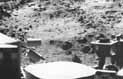
[72-73] These are views looking toward the southwest horizon at different times of day: early morning (fig. 77), early afternoon (fig. 78), and late afternoon (fig. 79). Different lighting accentuates different detail in both nearfield and farfield. Of special significance is the symmetrical skyline ridge revealed in figures 77, 78, and 79. Almost certainly this is the upraised rim of an impact crater, about 500 m in diameter and 2.5 km distant. Part of the far side of the central cavity can be discerned toward the left, particularly in figure 79. This same crater has been identified in Orbiter photographs and has been used to locate the Lander position. Refer to figure 204. Also visible beyond the crater rim is a ridge 8 to 10 km distant.
| |